


Hellbomb in Helldivers 2 as it is being called down.
"The Hellbomb is provided when the Helldivers need to destroy a stationary target."
- Armory Description
Stratagem Code[ | ]
In the original, players must enter the following sequence, using the controller d‑pad, in order to call down this Special stratagem during a mission:
![]()
![]()
![]()
![]()
![]()
![]()
The Hellbomb returns in Helldivers 2, with a longer and more complex code:
![]()
![]()
![]()
![]()
![]()
![]()
![]()
![]()
Unlock Requirement[ | ]
In both Helldivers and Helldivers 2, NUX-223 Hellbomb is a standard-issue stratagem, available to all Helldivers regardless of rank. However, Helldiver Command only provides this stratagem during missions that require the destruction of a stationary enemy target (Cyborg AA Guns, Bug Nests, Illuminate beacons, Automaton Equipment and Structures, or rogue Research Stations).
Helldivers 2[ | ]
The Hellbomb is practically unchanged as it appears in Helldivers 2. It has 3 fins spread out and a warhead which lights up as it raises into position when armed.
The only visible change to it is the screen on one of its sides that acts as a simple terminal where directional inputs are punched in to activate the device.
Similar to the first game, Hellbombs are only provided when there is a building ordered for destruction. The Hellbomb is not required to destroy the building, as it is achievable through other means. Furthermore, it can now only be called in when the player is close to said objective.
Damaged Hellbombs can be found during missions as a Point of Interest, sometimes embedded in the carcasses of Chargers, or due to a hidden planet modifier. While their terminal is inactive, these unexploded ordinances can still be set off by conventional ballistics, making them both a potential tool and/or danger to a squad.
As of PATCH 1.000.13, the Hellbomb terminal screen appears on the opposite side of the bomb from which the stratagem marker is thrown in relation to the player, making activating the bomb much more difficult if called within very close proximity of buildings, terrain, or enemies.
Helldivers[ | ]
This section contains information specific to Helldivers and how the Hellbomb stratagem behaves in that game.
Upgrades[ | ]
| Upgrade | Cost | Effect | |
|---|---|---|---|
| Mk1 | Basic variant, no upgrades. | ||
| Mk2 | Upgraded to have more health, allowing the NUX-223 Hellbomb to sustain more damage before failing. | ||
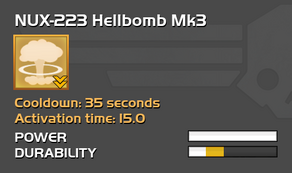
| Mk3 | New routines for handling nuclear material allows for the bomb to be readied much faster and cuts down on the call-in time (activation time reduced from 25 seconds to 15 seconds). | ||
Detailed Statistics[ | ]
For a detailed overview and comparison of the statlines for Helldivers, their equipment and all enemies, check the Detailed Statistics page.
| Health | Constitution | Armor | ||||
|---|---|---|---|---|---|---|
| Base | Decay | Base | Decay | Location | Min | Max |
| 100 | 0 | 0 | 0 | default (original) | 30 | 30 |
| 200 | default (upgraded) | |||||
Tactical Information[ | ]
- Hellbombs have a tertiary use in that they can be used as a practically limitless supply of improvised distractor beacons. Enemy patrols will gather around the Hellbomb, slowly whittling down its hit points, instead of raising the alarm when they spot a Helldiver. The Hellbomb can then be detonated to rid the area of enemies, or left as a lure for nearby patrols.
- After all 'Destroy' objectives have been completed, the Hellbomb will no longer be available for the remainder of the mission. This is worth keeping in mind when planning order in which mission objectives are to be completed.
- The blast radius of the Hellbomb is very large. In fact, only the Shredder Missile Strike stratagem has a comparable area of effect. Still, going prone allows Helldivers to survive nuclear explosions even at what seems like suicidally close proximity.
Alternatives to the Hellbomb[ | ]
'Destroy' objectives can also be eliminated using most anti-tank weapons and stratagems, such as (but not limited to):
Anti-tank Supply stratagems:
Anti-tank rounds fired by:
|
Anti-tank capable Offensive stratagems:
|
Note that not all weapons and stratagems are effective against all targets, particularly if the area of effect for their Anti-Tank or Explosive element is especially small. While the MLS-4X Commando can theoretically destroy objectives, its missiles require precise angle and distance as they do not home in on objectives; to make things worse, any nearby enemies will attract the missiles instead.
Also note that the only attack stratagems capable of destroying a shielded Illuminate Beacon are the Thunderer Barrage and Shredder Missile Strike; the Missile Barrage's spread is random and it will occasionally manage it, but all other approaches require the Beacon's shield be disabled first.
Lone Cyborg AA Guns can also be found on most missions in Cyborg territory, and will project a small jamming field of their own. As the single AA Guns are not powered by generators that can be disabled, their radar jamming is only shut down when they are destroyed. For this reason, non-objective Cyborg AA Guns are not vulnerable to the NUX-223 Hellbomb.
Gallery[ | ]
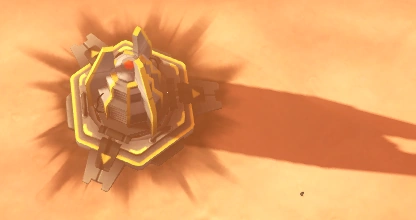
NUX-223 Hellbomb
Activated NUX-223 Hellbomb

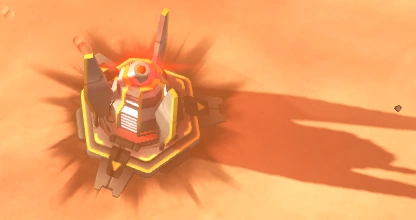
NUX-223 Hellbomb about to explode